Have a creative cocktail hour with these expert tips for photographing drinks


Capturing cheers-worthy drinks photos can be challenging, even for the most experienced photographers. You are dealing with glassware, condensation and rapidly melting ice just to name a few! To help you master the art of capturing refreshing drinks we have 6 great tips from perfecting your garnish to the best camera angles.
1. Choose glassware that complements your drink
Your glasses can be sleek and plain with a modern or sophisticated edge, clear or coloured, or patterned with beautiful cut details. Generally, I find that plain glasses are great for showing off lots of garnishes while heavily patterned glasses don’t need too many embellishments to highlight the drink.


2. Add creative flair with a garnish
Garnishes are a fun way to add that special detail and interest to your drink photography. A simple citrus peel, citrus wedge or rosemary sprig can add that pop of colour and extra bit of contrast and texture. I like to use complementary colours in my garnishes (colours that fall opposite each other on the colour wheel) to make my photos pop.
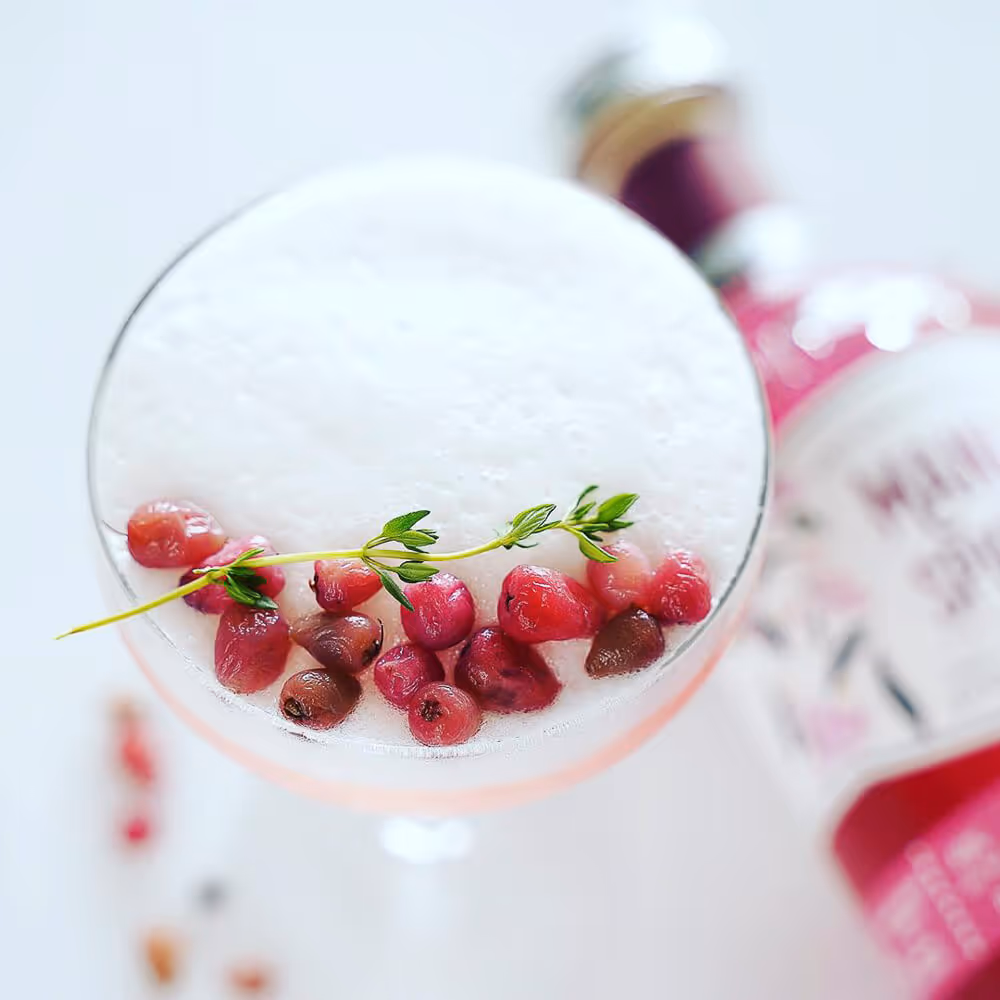
Also, think about the garnishes on the rims of your glasses. Adding salt or sugar to your glasses will add another layer of interest and detail to your composition.
Ice is also an obvious garnish and not only in your drink. Some scattered ice shards or cubes on the table and around your drink can add another element to portray a “I’m having a drink now” mood.
Tip - If you want that frosted, cold condensation look on your glass, simply mix a 50-50 ratio of water and glycerin and spray it onto your glassware.
3. Add some colour inside the glass
Here’s a tip - the contents of your cocktail doesn’t have to be alcohol! Don’t worry about wasting all your good alcohol to achieve that perfect shot.

For this shot, I used some leftover sparkling water that I had in my fridge and coloured it with a tiny bit of red and even less yellow food dye. I added some lemon juice that had seen better days to give a slightly cloudy effect to the drink. The pineapple skin though, was fresh as a daisy. The result - fresh lush ‘cocktails’ ready for late summer afternoon entertaining on the back deck.

I have also used plain old water with red food colouring or soy sauce as substitute drinks. No one has ever guessed the real from the fakes - and I’m not telling!
4. Style your drinks and compose your scene
This is one of my favourite steps. This is where your glasses, the liquid inside the glasses and the props, all come together to create a mouthwatering scene. Think about whether you want to highlight one drink or a few. Are you going for one standalone hero shot, or highlighting one of many?

There are some key elements in drink photography that work to make a pleasing composition. Focusing on the details of one drink with a range of props (like in the first shot) or shooting multiple glasses, can both convey a story.
Multiples can convey a sense of sharing, togetherness and community. If you want to shoot a bunch of drinks, go for an odd number - three drinks are always a winner. An odd number (rule of thirds) of drinks will produce a more interesting, visually pleasing composition. You don’t need to see all the glasses in their entirety but you definitely could highlight one as the main subject, by placing it in a powerful place in your composition (see second pic).

Also, widen your aperture (smaller f stop number) to achieve that beautiful background blur or bokeh. I just love how the gold rim on the glasses shimmers and shines as it softens and smears into the background. (second pic)
Tip - When planning your composition, prepare your scene with empty glasses. If you fill and style your drinks while still deciding where your props will sit or what your camera settings will be, you can guarantee, your ice will be melted, your garnish will droop and you’ll end up with an unwanted puddle on your scene. My tip is to get your composition perfectly set up, your camera ready to shoot and substitute your mock glasses with your freshly prepared drinks.
5. Use a camera angle that will capture all the detail
There are three main drink photography angles: overhead, 450 angle, or straight on.
450 angle is probably the most common camera angle for shooting drinks. It's a popular angle because it's so versatile. It allows you to show the front and surface of the glass, as well as the sides.

The straight on shot is less common but a fun way to shoot drinks. This camera angle is most suitable for tall drinks where you want to show off the garnish or the colours in the glass.

The Overhead shot also shows off the garnish in your glass. It highlights the texture and details.

6. Remember - lighting is everything
I’ve kept the most important one till last. Light is everything in photography and in drink photography, it is its lifeline.
A trend that has been popular in product, portrait, food and drink photography is hard light. It’s a look that I'm seeing everywhere these days. So, what is it? Generally speaking, there are two main types of lighting: soft and hard. Both can be achieved using natural light (i.e the sun) and artificial light. The main difference between the two is the quality of the shadows that you get when the light is cast on the subject.
Soft light has very soft shadows, sometimes barely visible at all, that are easy to see through. Soft light is used to make the subject look similar to the way that our eyes ideally envision it.
Hard light is the opposite. It is characteristic of having very dark shadows and very bright, directional light on the subject. There is an abrupt transition between the light and the shadows. It’s known for being edgy and dramatic. It makes the subject pop.

In addition to deciding on using hard or soft light, you also need to consider where you want the light to fall on your drink/s.
My go-to light for drinks these days is backlight. This is when the light source (the sun, in my case) is behind the drink. Illuminating your drink from the back adds a wow factor.
For this shot, the light source is directly behind and slightly above the drinks, and I’ve used a reflector to gently illuminate the front of the glasses.
Clear liquid and glassware is the perfect combo for backlight and coincidentally hardlight too. The light seems to shimmer through the liquid giving that luminous look and feel to the drink.

Backlight is special in drink photography because it shows all the details - the condensation and the bubbles and the cut of the glass. As you shoot, look for the glow in your glass. You might have to angle down a bit, keep looking for that magic light glow on top of your drink. It’s a stunning feature of the shot.
There you have it - my 6 tips for photographing drinks.
To read more of Sue's great creative advice head to her blog or find her on Instagram at @suesinko.photography


%20(1).png)
%20(1).png)


